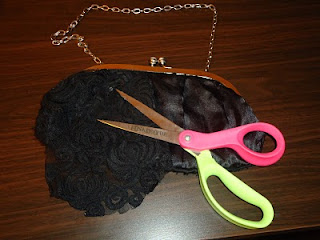
Seeing as blogger rudely deleted my post from yesterday of my clutch bag and didn't return it to my blog as their maintenance page informed me it would I'm having to repost it again!
So a small dilemma happened when I last wanted a black bag for night out.. my little black clutch bag looked sad, worn and well, hideous to be honest... in the end I changed my whole outift as I didn't want to be seen with such an awful looking bag. The other day I had a brainwave and thought I could make it over as it's only the outer fabric that's shabby.
So a small dilemma happened when I last wanted a black bag for night out.. my little black clutch bag looked sad, worn and well, hideous to be honest... in the end I changed my whole outift as I didn't want to be seen with such an awful looking bag. The other day I had a brainwave and thought I could make it over as it's only the outer fabric that's shabby.
And after a little bit of thinking and throwing fabrics out of the drawer this is what I came up with....

Refashion for women: Clutch bag makeover
If you want have a go at this too then you'll need:
- a clutch bag
- complementing colour fabric
- fabric flower
- 22 x 6mm beads
- glue gun
- scissors
1. First I cut the lacy fabric off (this was the bit that was amking my bag look awful so it had to go). The fabric underneath is great and is the same as the fabric I used for the leaves to cover it.
2. Take your fabric and cut it into little pieces, one for every leaf. Make a small pile of fabric, draw a leaf on the top piece and cut it out, repeat till you have enough to cover the bag. (I needed 36 to cover my bag)
3. Start by glue gunning the first leaf at the bottom of the metal frame.
4. Continuing glue gunning the leaves along the bottom of the bag.
5. Continue by sticking leaves in layers that just about cover the top of the leaves on the layer beneath.
7. Glue the top layer as close to the metal frame as possible. Don't worry if there's a little glue overspill as the beads will cover this.
8. Start glueing the beads along the lower edge of the metal frame, removing excess glue before it dries.
9. Continue glueing beads on till there's enough along the frame to mirror the starting point on the opposite end.10. Add the fabric flower as an embellishment and then the bag is finished!
Looks 100 times better than it did when I started and now I'm more than happy to take it out with me :) If the fabric flower isn't your taste then skip the last step as it still looks good without it, or perhaps add a different embellishment to suit the outfit you want it to go with.


Không có nhận xét nào:
Đăng nhận xét